
NATURAL HAIRSTYLE PICTORIAL: THE HORIZONTAL ROLL AND TUCK
By Hadassah Agbaps - September 14, 2016
Hi people, what's been on?
Today is another pictorial about a simple style you can do on short, medium and long textured natural hair. It's called the horizontal roll and tuck.
So let's begin!
What you'll need.
- Water in a spray bottle to lightly wet the hair to make it pliable.
- Styling cream, leave in or butter for moisture and shine.
- Gel or edge control for smoothing flyways
- Lots of bobby pins to hold the style in place.
- short, medium or long natural hair.
Tips:
The more texture and volume you have, the bigger the rolls.
If you have shorter hair, you can stretch it a little with twistouts, braidouts, African threading or blowout. You can also make smaller horizontal parts to roll.
If you have fine hair with less volume, a light blowout will give you some volume or you can work with your natural shrinkage.

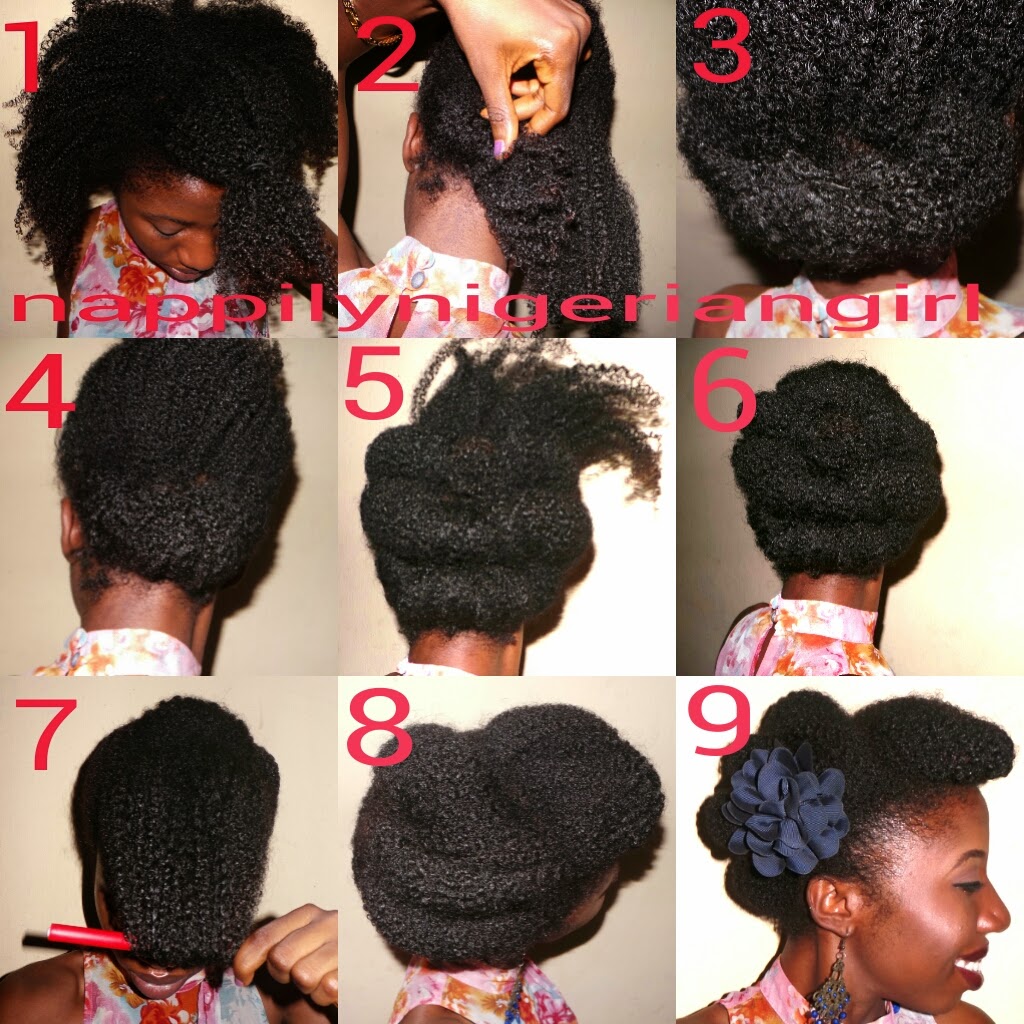
How To:
1. First section out the front that will make your pompadour or bangs and clip away.
2. Starting from the nape, separate a medium horizontal section from left to right. (The smaller the sections, the more rolls you'll have...though with less volume).
3. Roll the hair upward loosely from left to right (or right to left depending on which hand you favor).
4. When you get to the end of the roll, use a bobby pin to tuck the end neatly so you ccan't really see it again.
5. Make another horizontal part above the finished one. Roll and pin this section too.
6.When you get to your last section, roll downwards and pin. It will give you smoother results.
7. For your front section, take a medium sized bendy roller and roll your hair inwards and bend the edges to give a nice shape. Adjust your hair to cover the bendy rollers.
8. Smoothen loose hair and edges with gel.
9. Accessorise and you're done!
If your hair isn't long enough to wrap around the rollers, here's another way to style your front section.

1. Divide your front section into to two. Take the end of the right section (pink) and pin under the left section (pink point), then take the left section (blue) and pin under the right pat (blue point).
2. Make your adjustments and voila!
Happy Styling! !!
Don't forget to tag me on Instagram or send your pics so I'll share!t
Today is another pictorial about a simple style you can do on short, medium and long textured natural hair. It's called the horizontal roll and tuck.
So let's begin!
What you'll need.
- Water in a spray bottle to lightly wet the hair to make it pliable.
- Styling cream, leave in or butter for moisture and shine.
- Gel or edge control for smoothing flyways
- Lots of bobby pins to hold the style in place.
- short, medium or long natural hair.
Tips:
The more texture and volume you have, the bigger the rolls.
If you have shorter hair, you can stretch it a little with twistouts, braidouts, African threading or blowout. You can also make smaller horizontal parts to roll.
If you have fine hair with less volume, a light blowout will give you some volume or you can work with your natural shrinkage.
How To:
1. First section out the front that will make your pompadour or bangs and clip away.
2. Starting from the nape, separate a medium horizontal section from left to right. (The smaller the sections, the more rolls you'll have...though with less volume).
3. Roll the hair upward loosely from left to right (or right to left depending on which hand you favor).
4. When you get to the end of the roll, use a bobby pin to tuck the end neatly so you ccan't really see it again.
5. Make another horizontal part above the finished one. Roll and pin this section too.
6.When you get to your last section, roll downwards and pin. It will give you smoother results.
7. For your front section, take a medium sized bendy roller and roll your hair inwards and bend the edges to give a nice shape. Adjust your hair to cover the bendy rollers.
8. Smoothen loose hair and edges with gel.
9. Accessorise and you're done!
If your hair isn't long enough to wrap around the rollers, here's another way to style your front section.
1. Divide your front section into to two. Take the end of the right section (pink) and pin under the left section (pink point), then take the left section (blue) and pin under the right pat (blue point).
2. Make your adjustments and voila!
Happy Styling! !!
Don't forget to tag me on Instagram or send your pics so I'll share!t


2 comments
Love it! Particularly that trick with the bendy roller
ReplyDeleteYour style is beautiful. I will definitely try it out.
ReplyDeleteHave a question or comment? We would love you to share!!!!